
Trigonometry for Game Programming – SpriteKit and Swift Tutorial: Part 2/2
Learn trigonometry for game programming using SpriteKit and Swift. You will learn the theory and then practice using trigonometry by making a space shooter game! By Bill Morefield.
Making a Missile Travel at a Constant Speed
There's still one problem. The missile appears to travel faster or slower depending on the distance it travels.
That's because the duration of the animation is hard-coded to last 2 seconds. If the missile needs to travel further, it will travel faster in order to cover more distance in the same amount of time. It would be more realistic if the missiles always travel at a consistent speed.
Your good friend Sir Isaac Newton can help out here! As Newton discovered, time = distance / speed. You can use Pythagoras to calculate the distance, so there's just the matter of specifying the speed.
Add another constant to the top of GameScene.swift:
let playerMissileSpeed: CGFloat = 300
This is the distance that you want the missile to travel each second. Now, replace the last code block you added in touchesEnded(_:with:) with:
// calculate distance
let distance = sqrt(pow(destination.x - playerSprite.position.x, 2) +
  pow(destination.y - playerSprite.position.y, 2))

// run the sequence of actions for the firing
let duration = TimeInterval(distance / playerMissileSpeed)
let missileMoveAction = SKAction.move(to: destination, duration: duration)
playerMissileSprite.run(missileMoveAction) {
   self.playerMissileSprite.isHidden = true
}
Instead of hard-coding the duration, you've derived it from the distance and speed using Newton's formula. Run the app again and you'll see that the missile now always flies at the same speed, no matter how far or close the destination point is.
And that’s how you use trig to fire off a moving missile. It’s a bit involved. At the same time, it’s fire and forget as SpriteKit does all the sprite movement animation work for you.
Detecting Collision Between Cannon and Missile
Right now, the missile completely ignores the cannon. That’s about to change.
You'll use a simple radius-based method for collision detection like before. You already added playerMissileRadius, so you're all set to detect cannon/missile collisions using the same technique you used for the cannon/ship collision.
Add a new method:
func checkMissileCannonCollision() {
  guard !playerMissileSprite.isHidden else { return }
  let deltaX = playerMissileSprite.position.x - turretSprite.position.x
  let deltaY = playerMissileSprite.position.y - turretSprite.position.y

  let distance = sqrt(deltaX * deltaX + deltaY * deltaY)
  if distance <= cannonCollisionRadius + playerMissileRadius {

    playerMissileSprite.isHidden = true
    playerMissileSprite.removeAllActions()

    cannonHP = max(0, cannonHP - 10)
    updateHealthBar(cannonHealthBar, withHealthPoints: cannonHP)
  }
}
This works pretty much the same as checkShipCannonCollision(). You calculate the distance between the sprites, and consider it a collision if that distance is less than the sum of the radii.
If the collision is detected, first hide the missile sprite and cancel its animations. Then reduce the cannon's hit points, and redraw its health bar.
Add a call to checkMissileCannonCollision() inside the update(_:) method, immediately after the other updates:
checkMissileCannonCollision()
Build and run, then try it out. Finally you can inflict some damage on the enemy!

Before moving on, it would be nice if the missile had some sound effects. As with the ship-turret collision before, you can play sounds with a SpriteKit action. Add the following two properties to GameScene:
let missileShootSound = SKAction.playSoundFileNamed("Shoot.wav", waitForCompletion: false)
let missileHitSound = SKAction.playSoundFileNamed("Hit.wav", waitForCompletion: false)
Now, replace playerMissileSprite.run(missileMoveAction) in touchesEnded(_:with:) with:
playerMissileSprite.run(SKAction.sequence([missileShootSound, missileMoveAction]))
Rather than a single action to move the missile, you're setting up a sequence to play the sound then move the missile.
Also add the following line after updateHealthBar(cannonHealthBar, withHealthPoints: cannonHP) in checkMissileCannonCollision():
run(missileHitSound)
The missile now shoots out with a ZZAPP sound, and, if your aim is true, hits the turret with a satisfying BOINK!
Adding an Orbiting Asteroid Shield for the Cannon
To make the game more challenging, you will give the enemy a shield. The shield will be a magical asteroid that orbits the cannon and destroys any missiles that come near it.
Add a few more constants to the top of GameScene.swift:
let orbiterSpeed: CGFloat = 120
let orbiterRadius: CGFloat = 60
let orbiterCollisionRadius: CGFloat = 20
Initialize a sprite node constant and add a new property in GameScene:
let orbiterSprite = SKSpriteNode(imageNamed:"Asteroid")
var orbiterAngle: CGFloat = 0
Add the following code to the end of didMove(to:):
addChild(orbiterSprite)
This adds the orbiterSprite to the GameScene.
Now, add the following method to GameScene:
func updateOrbiter(_ dt: CFTimeInterval) {
  // 1
  orbiterAngle = (orbiterAngle + orbiterSpeed * CGFloat(dt)).truncatingRemainder(dividingBy: 360)

  // 2
  let x = cos(orbiterAngle * degreesToRadians) * orbiterRadius
  let y = sin(orbiterAngle * degreesToRadians) * orbiterRadius

  // 3
  orbiterSprite.position = CGPoint(x: cannonSprite.position.x + x, y: cannonSprite.position.y + y)
}
The asteroid will orbit around the cannon in a circular path. To accomplish this, you need two pieces: the radius that determines how far the asteroid is from the center of the cannon, and the angle that describes how far it has rotated around that center point.
This is what updateOrbiter(_:) does:
- It increments the angle by
orbiterSpeed, adjusted for the delta time. The angle is then wrapped to the 0 - 360 range usingtruncatingRemainder(dividingBy:). That isn't strictly necessary, assin()andcos()work correctly with angles outside of that range, however if the angles get too large then floating point precision may become a problem. Also, it's easier to visualise angles if they are in this range for debugging purposes. - It calculates the new X- and Y-positions for the orbiter using
sin()andcos(). These take the radius (which forms the hypotenuse of the triangle) and the current angle, then return the adjacent and opposite sides, respectively. More about this in a second. - It sets the new position of the orbiter sprite by adding the X- and Y-positions to the center position of the cannon.
You have briefly seen sin() and cos() in action, but it may not have been entirely clear how they worked. You know that both of these functions can be used to calculate the other side lengths of a right triangle, once you have an angle and the hypotenuse.
But aren’t you curious why you can actually do that?
Draw a circle:
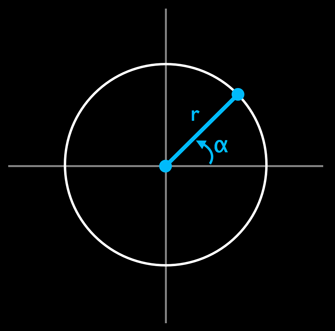
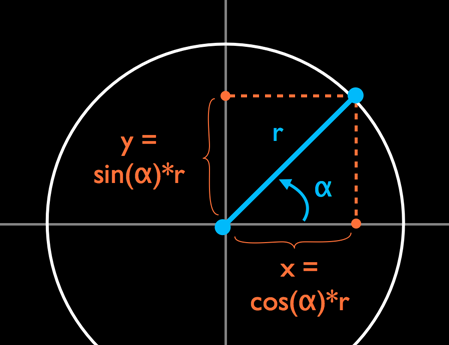
The illustration above exactly depicts the situation of the asteroid orbiting around the cannon. The circle describes the path of the asteroid and the origin of the circle is the center of the cannon.
The angle starts at zero degrees but increases all the time until it ends up right back at the beginning. As you can see, it's the radius of the circle that determines how far away from the center the asteroid is placed.
So, given the angle and the radius, you can derive the X- and Y-positions using the cosine and sine, respectively:
Now, take a look at a plot of a sine wave and a cosine wave:
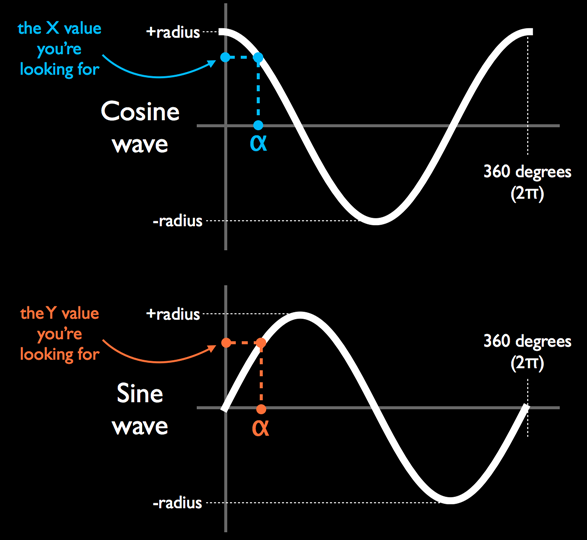
The horizontal axis contains the degrees of a circle, from 0 to 360 or 0 to 2π radians. The vertical axis usually goes from -1 to +1. But if your circle has a radius that is greater than one and it tends to, then the vertical axis really goes from –radius to +radius.
As the angle increases from 0 to 360 degrees, find the angle on the horizontal axis in the plots for the cosine and sine waves. The vertical axis then tells you the x and y values:
- If the angle is 0 degrees, then cos(0) is 1 * radius but sin(0) is 0 * radius. That corresponds exactly to the (x, y) coordinate in the circle: x is equal to the radius, but y is 0.
- If the angle is 45 degrees, then cos(45) is 0.707 * radius and so is sin(45). This means x and y are both the same at this point on the circle. Note: if you’re trying this out on a calculator, then switch it to DEG mode first. You’ll get radically different answers if it’s in RAD mode (no pun intended :]).
- If the angle is 90 degrees, then cos(90) is 0 * radius and sin(90) is 1 * radius. You’re now at the top of the circle where the (x, y) coordinate is (0, radius).
- And so on, and so on. To get a more intuitive feel for how the coordinates in the circle relate to the values of the sine, cosine and even tangent functions, try out this cool interactive circle.
Did you also notice that the curves of the sine and cosine are very similar? In fact, the cosine wave is simply the sine wave shifted by 90 degrees.
Call updateOrbiter(_:) at the end of update(_:):
updateOrbiter(deltaTime)
Build and run the app. You should now have an asteroid that perpetually circles the enemy cannon.